ATiles
Quick navigation:
Get Pro Version:
User Manual
Follow AvizStudioTools:
Contact us:
About
The standard (free) version of the script can create different objects with repeatable geometry by defining the size and the offset between the individual elements. Also instead of the offset you can define the count of the tiles and they will be equally distributed according to the entered dimensions. User can define the tilt angle of the object (useful for roof-tiles), region constraint and many more options in the ATiles object’s parameters.
![]()
![]()
![]()
![]()
![]()
ATiles Pro
Pro version includes all the features of the free version plus:
- Create ATiles object with one click from roof plane, geometry or spline.
- Cache mesh for speed. Store inside ATiles object generated geometry for viewport and render.
- Re-create mode. Rebuild objects without losing material or connection to other objects.
- More advanced tools – Volume, Path(beta) and Surface(beta) tools.
- Random transformations of the tiles – Rotate, Move and Scale.
Download & Install
This script works with 3ds Max 7 or later. Standard version of the script is free for commercial and non-commercial projects. You are not allowed to sell or distribute this script or any parts of it. We are not responsible for any damages or incompatibilities that may result by using this script.
- Download, extract and install the latest version.
- Restart 3ds Max.
- To create ATiles objects go to Create Panel (where you create boxes, planes and so on), from drop-down menu select AvizstudioTools and then press ATiles button.
Manual Start & Installation:
- Download and unzip the desired version. If the version has an installer, install it in empty folder.
- From 3ds Max menu select:
MAXScript> Run Script …>AvizStudioTools_ATiles.mse - If you want to load the script automatically, copy «AvizStudioTools_ATiles.mse» file from the archive
in 3ds Max root folder\scripts\startup\
- To add a keyboard shortcut or toolbar button for ATiles ToolBox go to 3ds Max menu, select: Customize > Customize User Interface… > in «Keyboard» or «Toolbar» tab select Group: Main UI and Category: AvizStudioTools. Assign keyboard shortcut to «ATiles Tool» from «Keyboard» tab or from «Toolbar» tab drag and drop «ATiles Tool» to a new or existing toolbar to create UI button for the script (for Windows 7 or Vista you may need to run 3ds max as administrator).
Videos
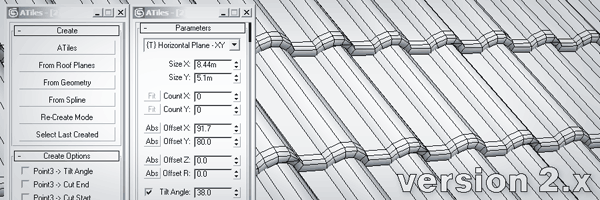
Interface
Parameters
Size X,Y,Z – Set the size of the ATiles object for local X,Y or Z. When set to zero, script use corresponding «Count» and «Offset» values to calculates the object’s size.
Count X,Y,Z – Set the count of the elements in the ATiles object for X, Y or Z. When set to zero script bypasses this value and use corresponding «Size» and «Offset». If type of the ATiles object is XY or XZ and «Count Y» or «Count Z» is set greater then zero, script will not ask user for third point when creating new object.
[Fit] Buttons – Fit tiles in the size of the object. Corresponding count should be more then one. (New in version 2.0)
Offset X,Y,Z – Set the offset of the elements in the ATiles object for X, Y or Z.
Offset R – Set the offset for every even row. (New in version 1.2)
[Abs] Buttons – Set absolute offset of the elements in the ATiles object ON and OFF . When ON, corresponding offset is exact distance between elements. When OFF, offset is percent of the element’s size. (New in version 1.1)
Tilt Angle – Set local rotation by X axis of the elements in the ATiles object.
Cut Start – Set the angle of cutting plane starting from first point of ATiles object. On/Off check box.
Cut End – Set the angle of cutting plane starting from second point of ATiles object. On/Off check box.
Cut Top – Set the angle of cutting plane at the top of ATiles object. On/Off check box. (New in version 2.0)
Cut Base – Set the angle of cutting plane at the base of ATiles object. On/Off check box. (New in version 2.0)
[Add New…] [R] [U] [X] Buttons -Add, Redefine, Update and Delete custom tiles. Script stores only the name of the picked object. If you rename or delete the original object in the scene ATiles update button will not work. (New in version 2.0)
Auto Align Custom Tiles – When ON, script applies auto align function to custom tiles. When OFF, script uses pivot point of the original object.
Advanced Parameters
Max Count – Set the maximum tiled elements in the object. Use it to limit the script to create too big objects that may exceed Max Script memory or crash the program.
Cut Offset – Set the offset of the cutting planes.
Opt. Create – Set maximum face count after which script will temporary replace sub elements with selected optimized tile below when creating or modifying object.
To disable this option set high value. (New in version 1.4)
Cache Mesh For Speed – Store viewport and render meshes into the object to reduce unnecessary rebuilds of the object. Improve general speed and open file speed. Increase file size. (New in version 2.0)
Scale – Element – Set the scale of the chosen element in the object. When set to 1.0 the element is the same as the original, when set to 0.5 the element is half the size of the original, when set to 2.0 the element is twice bigger than the original and so on.
Scale – Offset – Set the scale of the offset values in the object. When set to 1.0 offset values are the same as shown in dialog box, when set to 0.5 offset values are 50% of the original, when set to 2.0 offset values are 200% of the original and so on.
Scale – Local X,Y,Z – Set the internal scale of the sub elements for X, Y and Z. (New in version 1.4)
Align – Rotate X,Y,Z – Rotate tiles to specified angle for X, Y and Z. (New in version 2.0)
Align – Offset X,Y,Z – Move tiles to specified offset for X, Y and Z. (New in version 2.0)
Align – Mirror XY,YZ,ZX – Mirror tiles across selected plane. (New in version 2.0)
[Reset] Button – Reset to default value Advance Parameters settings. (New in version 1.2)
Advanced Tools
[ToolBox] Button – Start new floating window in which user can control all preferences of ATiles object for selection of one or multiple objects.
Advanced Tools – Region – Define region to interact with the ATiles object. Use [Pick Region…] button to pick custom shape from the scene. With [X] button user can delete selected custom shape and with [U] button user can update selected custom shape. The script stores only the name of the chosen shape. If you rename or delete original object in the scene, update button will not work. The script uses standard Boolean operations with the defined region – Subtract and, Intersect. Select None to ignore the region.
Advanced Tools – Volume – Same as region but instead of shape you can define closed mesh as volume. (New in version 2.0)
Advanced Tools – Path (beta) – Define path for the object. Still in beta. (New in version 2.0)
Advanced Tools – Surface (beta) – Define surface for the object. Still in beta. (New in version 2.0)
Path/Surface Options: Align – Set custom point of alignment for Path and Surface Tools. (New in version 2.0)
Path/Surface Options: Align Point X,Y,Z – Use to shift the point of alignment. When X=0, Y=0, Z=0 the align point is the closest point to origin and when X=100, Y=100, Z=100 is the farthest point. (New in version 2.0)
Variations
Random Material ID – Apply random material ID for each tile form- to value. If «Only For ID» object is selected script will randomize only ID of faces with specified ID number. (New in version 2.0)
Random Transforms – Random transformations of the tiles – Rotate, Move and Scale.
Trans. Center X, Y, Z – define the center of the transformation, where X=0, Y=0, Z=0 is closet point to origin and X=100, Y=100, Z=100 is the farthest point. (New in version 2.0)
About
About This Object – Statistic about used tiles count, face count and time it took to build this object. Tiles count show how many tiles were used to create this object and in most cases is greater and not equal to the count of the tiles you see in the viewport.
Tips & Shortcuts
Control the tilt angle when creating ATiles object – Turn on 3D snap. While picking third point hold ALT to automatically change the tilt angle base on the snapping point, hold SHIFT if you want the tilt angle to be set to zero. Make sure Count Y or Z is set to zero, otherwise script will not ask user for third point.
Reset All – Hold SHIFT and press [Reset] button in Advanced Parameters to reset all parameters of the ATiles object to default values.
Источник
AvizStudio Tools — ATiles
ATiles is scripted 3ds Max plug-in for creating roof tiles, tiled floors, brick walls, fences, and more.
Pro version of the script (commercial) includes all the futures of the free version plus:
- Create ATiles object with one click from roof plane, geometry or spline.
- Cache mesh for speed. Store inside ATiles object generated geometry for viewport and render.
- Re-create mode. Rebuild objects without loosing material or connection to other objects.
- More advanced tools — Volume, Path(beta) and Surface(beta) tools.
- Random transformations of the tiles — Rotate, Move and Scale.
- Bug fix for «unable to convert: undefined to type: String» error in About roll-out of ATiles object.
- Fix UI alignment when using high DPI display or Windows scaling bigger then 100%
- Resizable multi-column ATiles Toolbox
- Auto load preset on startup option
- Auto load presets list on startup option
- Lock Element and Offset scale checkbox
- Lock Local XYZ scale checkbox
- Other small bug fixes
- Always create a region – option
- Other small bug fixes
- New Region & Volume mapping option
- Other small bug fixes
- New Presets system
- Included 100 new presets in 10 categories
- Region and Volume optimization
- Random Material optimizations
- Transforms and material variations on sub-object level
- Other small bug fixes and optimizations
- Fixes small bugs.
- Speed optimizations.
- Select Similar function — select similar ATiles objects based on their parameters.
- Create Roof/Geometry object based on smoothing group (ATiles Pro only).
- Create Roof/Geometry object based on face normal (ATiles Pro only).
- Create options to set tilt and cut angles from points in the viewport.
- Option to fit tiles count to given size for X, Y or Z.
- Option to control base and top cut angles.
- Option to redefine custom tile. Unlimited custom tiles.
- Option to select main, first and viewport tile.
- Options to align tiles — move, rotate and mirror.
- Option to improve weld Accuracy for small object when a region is selected.
- Option to align region to tilt angle.
- Option to set material ID variation.
- Set internal scale of the sub elements for X, Y and Z.
- Auto optimization of sub elements when creating new object.
- New video — How to cover with ATiles complex roof .
- Option to replace first element or first row of elements with the element stored in «Custom2».
- New video — Haw to create custom roof tiles with version 1.30.
- Offset R — Offset every even row.
- Reset button — Reset parameters to default values.
- New download page with more information about the script.
- Offset Z — offset elements in Z-axis
- Absolute offset for X,Y and Z — Define exact distance between elements. You can turn it on or off with one click of a button.
Источник
Генератор черепицы 3 ds max
Новичок
Группа: Пользователи
Сообщений: 1
Регистрация: 03/11/2013
Пользователь №: 96 799
Добрый день всем форумчанам!
Не могу разобраться с плагином A-Tiles 2.01 для 3dsMAX. Не получается сделать черепицу на двухскатной кровле. Смотрела видео на этом сайте http://www.avizstudio.com/tools/atiles/
Делаю все как там — не получается, вообще не могу понять как работает этот плагин. То у меня не привязывается ко второй точке кровле, к третьей вообще ни разу не привязалась (нажатие на Alt не помогло). Кто-нибудь объясните пошагово что и как делать, какие привязки включать и какие горячие клавиши использовать, начиная с момента:
1) вот передо мной двухскатная кровля и Avizstudio Tools — ATiles.
2) Далее какие привязки нужно включить?
3) и как настроить правильно ATiles?


![]()

Бывалый
Группа: Пользователи
Сообщений: 148
Регистрация: 25/10/2012
Пользователь №: 86 660
Надо купить Про версию и сразу всё заработает.
А, не. На бесплатной тоже можно. Короче, смотри.
Для треугольной крыши выбираешь первые три Point-3 галочки. Включаешь 3Д привязку. Наводишь курсор на нижний угол крыши и ЗАЖИМАЕШЬ левую клавишу. УДЕРЖИВАЯ левую клавишу тянешь мышь во второй нижний угол крыши и отпускаешь кнопку мыши. Затем кликаешь в верхний угол крыши. Готово!
Для четырехугольной крыши нужно включишь первые три галочки Point-3 и и галочку Point-4. Затем сделать тоже самое, что выше, но в конце будет еще один клик по четвертому углу крыши.
И порядок выбора точек очень важен. Сначала левая нижняя, потом правая нижняя, потом левая верхняя, потом правая верхняя. И у меня плагин дико тормозит почему-то, из-за этого тоже точки иногда не привязывались. Возможно, у тебя не привязываются по той же причине, что и у меня. Если так, что это легко починить: нужно делать не быстрый клик при выборе точек, а «долгий». То есть, зажать кнопку мыши, чуть подождать и отпустить.))))) Тогда всё привязывается ровно.)
Вот такая крутая крыша получилась.))))

Сообщение отредактировал kvakazyabra — 12/11/2013, 18:06
Источник